I2C (Inter-Integrated Circuit)
-
⬜ https://www.electronicwings.com/arduino/arduino-i2c (example code)❤️
-
⬜ I2C Primer: What is I2C? (Part 1) (Analog Devices) ❤️
-
⬜ I2C FPGA
-
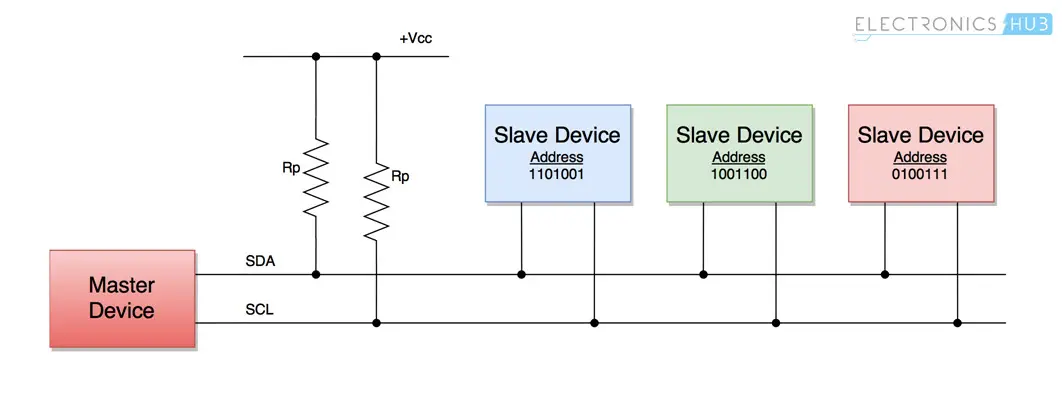
⬜ ▶️ What is I2C, Basics for Beginners ✅️ Low pin count (just 2)
- SDA (Serial Data)
- SCL (Serial Clock) ✅️ Addressing built-in ✅️ Ubiquitous 👎️ Half-duplex, 400 kbps max (sorta) 👎️ Careful consideration of hardware 👎️ More complicated than SPI or UART
-
Half duplex
-
Bidiretional
-
Error handling by ACK/NACK
-
Multimaster
-
Modes
- Master mode
- Slave mode
-
Synchronous
-
Clock stretching
-
Arbitration
- Use 4.7k resistor Pull Up and Pull Down Resistor I2C bus is an open drain configuration which means they can pull the corresponding signal line low but cannot drive it high. Hence the line will go into unknown state. In order to avoid this, pull up resistors need to be connected on SCL and SDA pins.
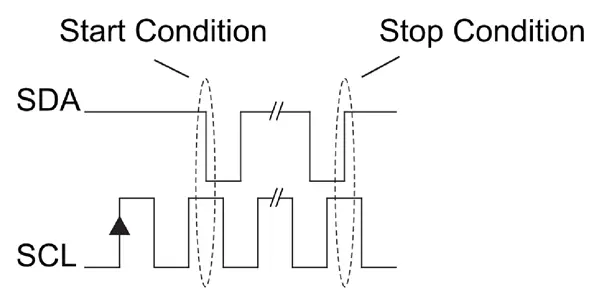
Start Condition And Stop Condition Transitions
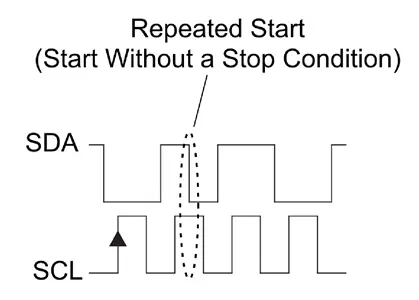
Repeated Start
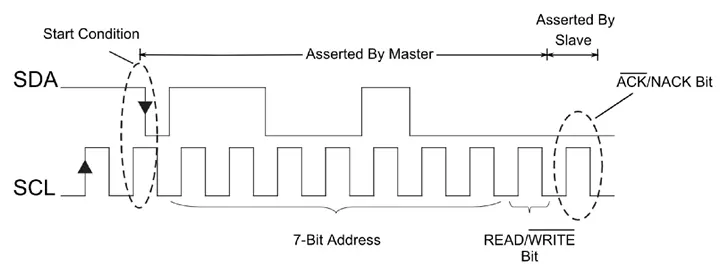
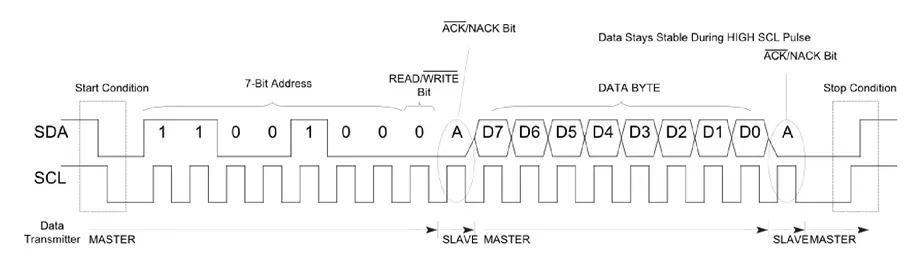
Start Condition Followed By 7-Bit Address of 0×64 and a Write Command Set. The Slave Responds with an Acknowledgement
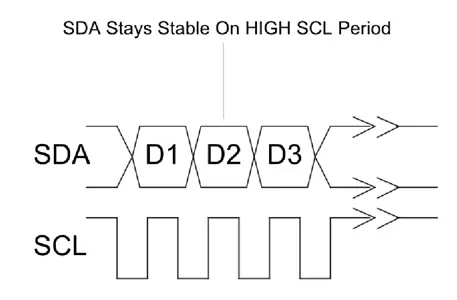
Bit Transition of Data Bits
Addressing
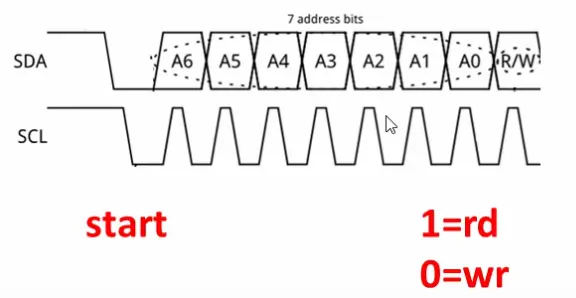
Slave interprets R/W as:
- 0 W: master want to write to me
- 1 R: master want to read from me

- Data always 8 bits long
Writing to a Device
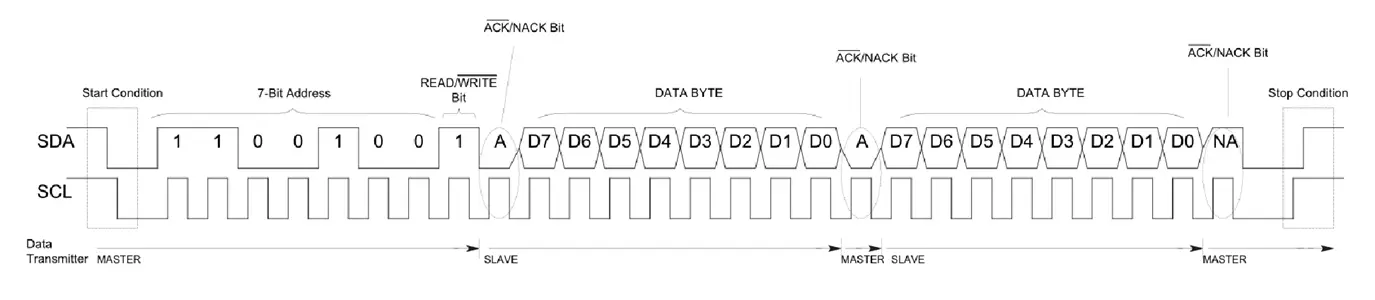
Reading From a Device
Combining Transmission Protocols

LTC2946 Serial Bus SDA Read Byte Protocol
Where
S = Start Bit P = Stop Bit R = Read Bit W\ = Write Bit A = Acknowledge A\ = Not Acknowledge
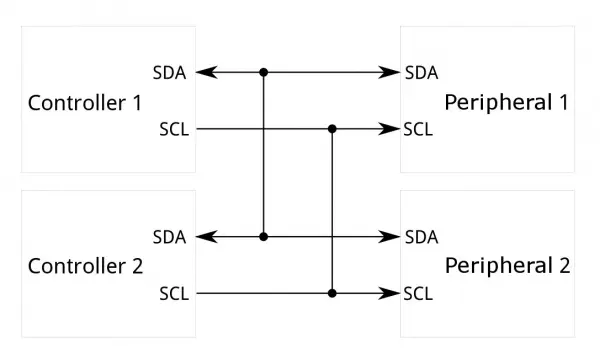
Master Writing to Two Different Slaves Sequentially

Multimaster/Multicontroller
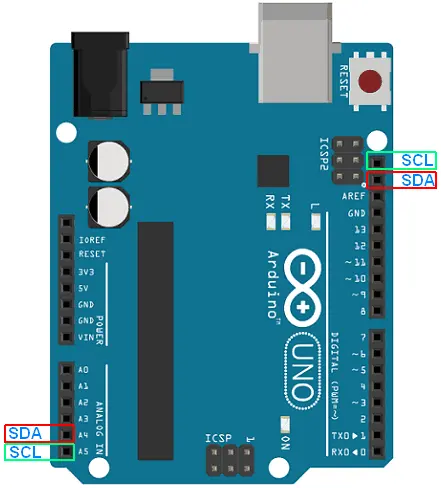
Arduino pin
| Board | SDA pin | SCL pin |
|---|---|---|
| Arduino UNO | A4 | A5 |
| Arduino Nano | A4 | A5 |
| Arduino Mega 2560 | 20 | 21 |
| Arduino Micro | 2 | 3 |
| Arduino Leonardo | 2 | 3 |
I2C Communication between Two Arduino

Master
{{{code: lang=“cpp” linenumbers=“True” Wire.write(7); //send data byte Wire.write(“i2c”); //send string to slave device Wire.write(a, 6); //here a is an array }}}
{{{code: lang=“cpp” linenumbers=“True” #include <Wire.h>
void setup() { Wire.begin(); // join i2c bus (address optional for master) }
byte x = 0;
void loop() { // 7-bit address of device with which we want to communicate. Wire.beginTransmission(8); // transmit to device #8 Wire.write("x is "); // sends five bytes Wire.write(x); // sends one byte Wire.endTransmission(); // stop transmitting
x++; delay(500); } }}}
Slave
{{{code: lang=“cpp” linenumbers=“True” #include <Wire.h>
void setup() { Wire.begin(8); // join i2c bus with address #8 Wire.onReceive(receiveEvent); // register event Serial.begin(9600); // start serial for output }
void loop() { delay(100); }
// function that executes whenever data is received from master // this function is registered as an event, see setup() void receiveEvent(int howMany) { while (1 < Wire.available()) { // loop through all but the last char c = Wire.read(); // receive byte as a character Serial.print©; // print the character } int x = Wire.read(); // receive byte as an integer Serial.println(x); // print the integer } }}}
Two-way communication between two Arduino using I2C
Master
{{{code: lang=“cpp” linenumbers=“True” #include <Wire.h>
void setup() { Serial.begin(9600); /* begin serial comm. / Wire.begin(); / join i2c bus as master */ Serial.println(“I am I2C Master”); }
void loop() { Wire.beginTransmission(8); /* begin with device address 8 / Wire.write(“Hello Slave”); / sends hello string / Wire.endTransmission(); / stop transmitting */
Wire.requestFrom(8, 9); /* request & read data of size 9 from slave / while(Wire.available()){ char c = Wire.read();/ read data received from slave */ Serial.print©; } Serial.println(); delay(1000); } }}}
Slave
{{{code: lang=“cpp” linenumbers=“True” #include <Wire.h>
void setup() { Wire.begin(8); /* join i2c bus with address 8 / Wire.onReceive(receiveEvent); / register receive event / Wire.onRequest(requestEvent); / register request event / Serial.begin(9600); / start serial comm. */ Serial.println(“I am I2C Slave”); }
void loop() { delay(100); }
// function that executes whenever data is received from master void receiveEvent(int howMany) { while (0 <Wire.available()) { char c = Wire.read(); /* receive byte as a character / Serial.print©; / print the character / } Serial.println(); / to newline */ }
// function that executes whenever data is requested from master void requestEvent() { Wire.write(“Hi Master”); /*send string on request */ } }}}
Functions for Arduino I2C Master
{{{code: lang=“cpp” linenumbers=“True” int n = Wire.requestFrom(address, size) int n = Wire.requestFrom(address, size, stop) }}}
Parameters Address address of device with which we want to communicate No. of byte no. of byte needs to request Stop It is a Boolean. true - send a stop message after the request, releasing the bus, false - continually send a restart after the request, keeping the connection active
Returns No. of bytes returned from slave device.
Function for Arduino I2C Slave
When master send data to slave
{{{code: lang=“cpp” linenumbers=“True” void setup() { Wire.begin(8); // join i2c bus with address #8 Wire.onReceive(receiveEvent); // register event Serial.begin(9600); // start serial for output } void receiveEvent (int howmany){ while (1 < Wire.available()) { // loop through all but the last char c = Wire.read(); // receive byte as a character Serial.print©; // print the character } } }}}
When master request data from slave
{{{code: lang=“cpp” linenumbers=“True” void setup() { Wire.begin(8); // join i2c bus with address #8 Wire.onRequest(requestEvent); // register event } void loop() { delay(100); }
// function that executes whenever data is requested by master // this function is registered as an event, see setup () void requestEvent() { Wire.write("hello "); // respond with message of 6 bytes // as expected by master } }}}